Run Management and Tour Tracking
GDS allows you to set up locations at customer sites to be visited. You can then define schedules for when these locations should be visited, and what sorts of tasks should be performed during those visits.
Run Management
To set up run management, you must first set up some runs.
A run is defined as an officer with a callsign who is working in one or more areas for a particular time period during the week. For example, you might have areas called _NORTH_, _SOUTH_, _EAST_ and _WEST_, and a callsign with a code _100_ You could define run _100N_ to be the shift where callsign 100 works in the NORTH area from 6pm to 6am each night. You might define another run _100D_ to be the day time version - 6am to 6pm. Since things are less busy then, you might tell GDS that callsign 100 is working in the NORTH and EAST areas for the 100D run.
To add a run, go into Maintenance->Attending->Run Management.
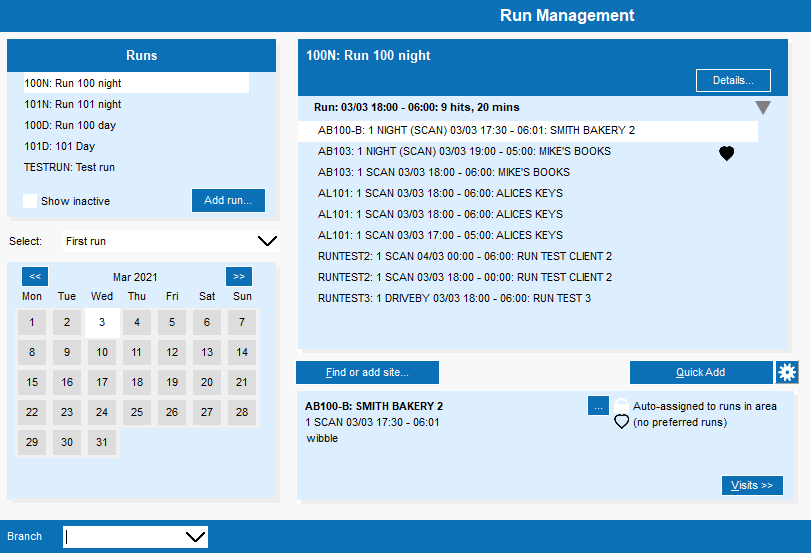
Currently defined runs are listed in the Runs column on the left. When you select a run to inspect it, today's shift is displayed on the right.
To add a new run, click the _Add run_ button at the bottom of the left column. The run details screen will appear:
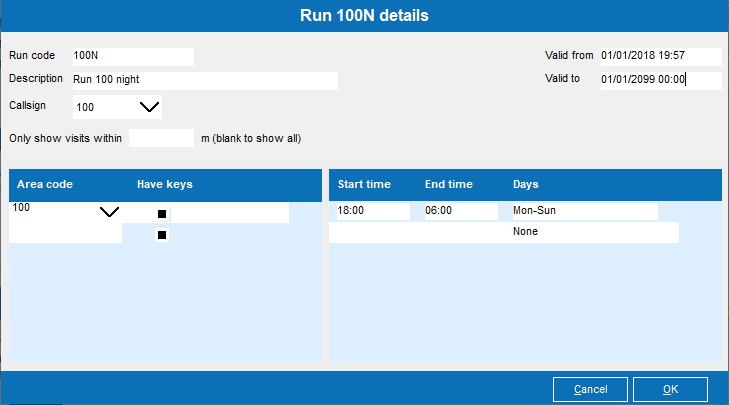
Fill out the areas on the left. For each area, tick _have keys_ if the guard on this run will have keys for the sites in this area. When assigning run visits to a run, GDS won't assign internal checks to this run unless the guard has keys.
Adding Run Visits
Run visits can be maintained from two places. If you have a lot of run visits to enter for different sites, do it from Run Management.
To add a run visit for a site that's not currently in the run, click 'Find or add site'. Find a site by searching for it, or if it's a new site you can add it here. Once that's done you'll see the run entry screen:
You can also access this screen by clicking on 'Runs' in the bottom right of the Locations tab in a client record. Use this when you just need to update run hits for individual clients.
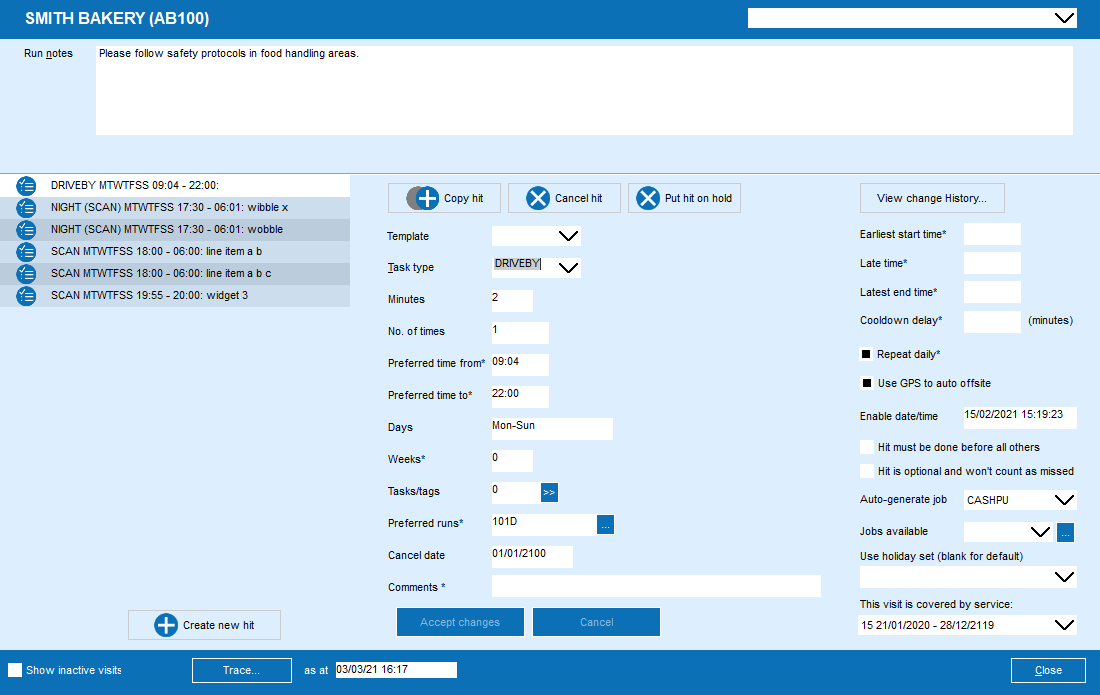
Once you're here, you'll see a summary of the hits for this client on the left-hand panel, and detail about each on the right panel. You can also add notes for the guards to the run notes panel at the top: the guards will be shown this whenever doing any run hit at this site.
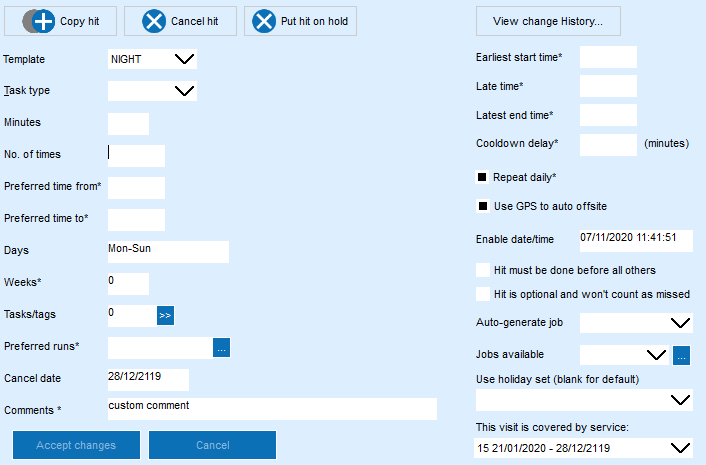
To add a new hit, click the 'Create new hit' button at the bottom of the left column.
When adding a new hit, you can use a template or fill the other required fields, then click the 'Accept changes' button to store the new hit. You can set the task type and the time from and to according to the client's request.
While GDS will use and show the preferred times entered here, it can apply some intelligence to these times:
- if the time range is less than 3 hours, the guard can arrive a little early (up to 30 minutes), or they can arrive late. We actually allow the task to be performed up to 6 hours late, which sounds odd at first, but generally makes sense: if we want a beddown, we want it done no matter what, even if it is very late. If these limits don't suit, hard limits can be set in the Earliest start time/Latest end time fields.
- if the time range is greater than 3 hours, then the preferred times are taken as the earliest and latest times without modification. This suits scenarios like 'three checks between 6pm and 6am'. If we don't complete the 3rd check by 6am we don't want it done at all.
- Template - can be used to set fill in the rest of the fields from a standard default, or leave it blank. See below for more details.
- Task type - the type of the task to be performed, for example BEDDOWN, EXT (external check), INT (internal check) and so on. You can set up task types under Maintenance->Client Servicing->Hit Types.
- Minutes - the estimated number of minutes to spend while onsite
- No. of times - the number of times to repeat this hit within the required period
- Preferred time from - the earliest time the client would like the task to be performed. In some circumstances we'll allow it to be done earlier than this (see below)
- Preferred time to - the latest time the client would like the task finished by. It may be extended (see below)
- Days - the days of the week to perform this task
- Weeks - the weeks on which to perform this task. 0 means every week. Other numbers specify a week number in a 4-week cycle: 1 means the first out of every 4 weeks; 13 means weeks 1 and 3. A letter may be added: H means holidays only, X means non-holidays only. So 0X means every week, but not on holidays, 0H means only on holidays, 24X means on weeks 2 and 4, but only on non-holidays.
- Tasks/tags are the tasks and barcodes or NFC tags to scan. Clicking in here will show the list of tasks to perform.
- Preferred runs - which run or runs we would like to see perform this hit. GDS will assign this hit to the runs specified if possible, but if they're inactive or cannot be assigned then GDS will choose another by default. You can also leave this field blank, in which case GDS will auto-assign this hit to a run in the area.
- Cancel date: when we should stop performing this hit. Use this to set temporary hits that should only be performed for a limited period of time. By default it'll be auto-filled with a distant future time.
- Comments are instructions that are specific to this hit, and will only be shown when performing this hit. For example, who to meet for a beddown.
- Earliest start time (optional) - If specified, GDS will use this as the absolute earliest time that we'll permit this hit to be done. For example, if the Preferred Time From is 18:00 and the Earliest Start Time is 17:30 then the guard will be shown the 6pm start time, but the system will actually allow the hit to be started at 5:30pm, covering us if the guard is a little early. If this is left blank, some automatic rules will be applied.
- Latest end time (optional) - If specified, this is the latest time we'll allow the hit to be completed. If blank, automatic rules will be applied.
- Late time (optional) - hits will be marked late if completed after this time
- Cooldown delay (optional) - number of minutes that must pass between successive repeats of this hit
- Repeat daily - if checked, repeat this hit on each day specified. Otherwise, we expect the hit to be performed the required number of times across the week on the days specified
- Use GPS to auto-offsite - if set, GDS will use the guard's GPS location to estimate when they went offsite from the hit. Otherwise they will need to mark offsite by tapping the 'Offsite' button in the run hit in the app
- Enable date/time - the earliest date to start these hits. Use this to set up hits that will start at a future date. Otherwise it's set to start now.
- Auto-generate job (optional) - a job template to generate. When the guard taps the onsite button for this hit, GDS will immediately generate a job from this template and put them into it. Use this to handle complex processes that need to be tracked or reported using jobs. Good for handling Cash in Transit.
- Jobs available - the set of job templates that will be available to a guard while performing this hit. For example, when performing a check of a car yard, you can set up templates that the guard can use to report insecure vehicles. These templates appear as buttons in the hit screen in the app which the guard can use if needed.
- Use holiday set - which holiday set to use for this hit. By default, when checking the holidays to apply to this hit, GDS will check here first. If it's blank, we'll use the client holiday set, the area holiday set, or the system-wide default.
- Service - which service covers this hit. The service can be used to charge for this hit. If the service is terminated then all hits attached to it will be cancelled.
- A solid heart: a preferred run has been set for this hit and it is currently on that run
- An empty heart: a preferred run has been set, but GDS was forced to assign to a different run. This can happen because it was done manually, or because the requested run was not active at the right time
- No icon: no preferred run has been set, so GDS has assigned this hit automatically.
These autoadjustments can be changed in System Options.
Here are the fields you can fill in detail:
Optimising Runs
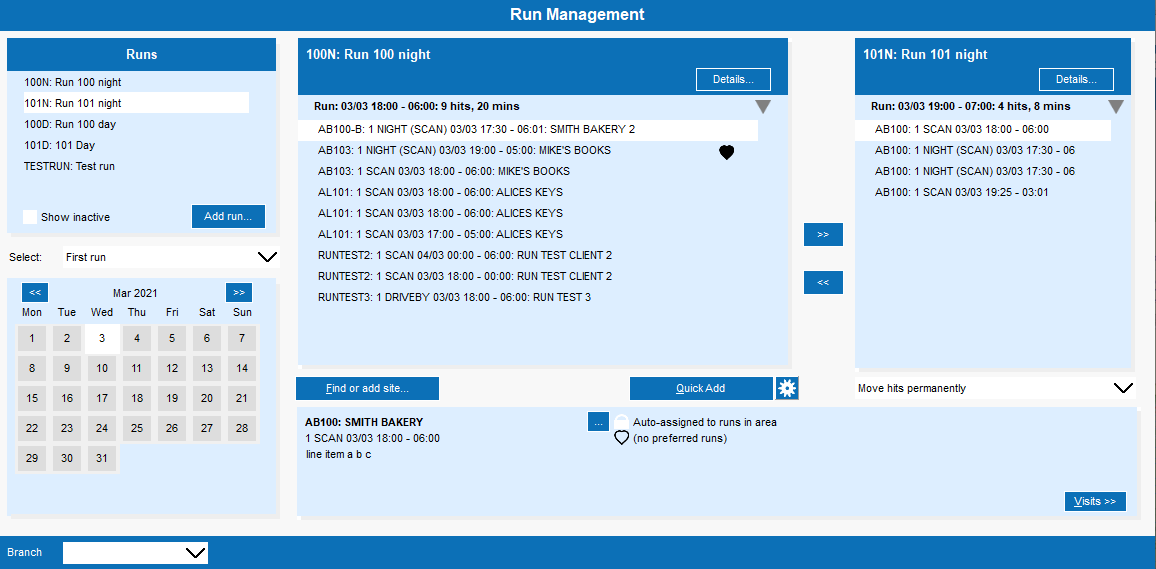
In Run Management (Maintenance->Attending->Run Management), you can view the hits assigned to a run. You can see future dates up to a week ahead by clicking on the calendar at the bottom.
If it has accurate locations for the clients involved, GDS will show the client locations on a map view. If the locations aren't accurate you can reset them by clicking the '...' menu button when a site is selected.
You can have GDS show two runs at once by holding down the CTRL button while clicking a second run in the run list on the left.
While showing two runs on the map, GDS will show one set of clients in green and the other in blue. This can help show if a client being visited should really be in the other run. Clicking on one of the icons will select and highlight the hits for the sites in the run list.
You can move hits from one run to another by selecting them and clicking the move arrows to move them to the other run. The dropdown below tells GDS whether we want to move these hits permanently (by setting the preferred run on the hits), or just temporarily, in which case just the hits on the currently selected day will be moved. You can select and move multiple hits at once by clicking the selection box to the right of each.
Each hit can also have an icon to the right of it:
Run Templates
Run templates allow you to create 'default' run hits. If you have a standard service you provide, you can define this as a template. Here's an example:
Let's define a template called STANDARD. It represents 2 checks between 7pm and 5am. To use it, you simply add a new hit and fill in only the template field, like this:
... GDS gets all of the other settings from the template. This makes setting up standard run service on clients really easy.
If any of the values in the template don't match the requirements for this hit, you can fill in just the parts that are different. For example, if the client wants the hit performed before 3am, you can fill in 03:00 in the preferred time to field and leave the rest blank; GDS will end the hit at 3am but all other settings will come from the template. A common field you might override in this way is the Comments field: the hit might be standard but there's something client-specific you want the guard to be aware of.
A handy trick with templates is that if you change the template, all hits defined with that template are automatically updated. Say you decide to extend your standard check hours so that they now start earlier, running from 6pm instead of 7pm. If you update the template with 6pm then all hits using that template will update to 6pm as well.
Templates can also be used to bulk-manage groups of clients with specialised requirements. For example, in one situation templates were used to manage two groups of schools, which were checked on alternating days over a holiday break. One group was assigned template SCHOOL1 and the other SCHOOL2. A custom holiday set was defined for each of the two templates, and this was used to determine which days would be covered by each template. Changing the dates in the holiday set altered which dates each group would be visited on. When the client decided they wanted the checks performed an hour earlier, this could be done quickly by updating the template times - this affected all of the checks in each group.
To define templates, go to Maintenance->Client Servicing->Hit Templates. Here you can add the template code and a description, then fill in the current date in the 'effective from' column. The rest of the fields are the same as used when adding run hits.
If you need to change the template in future, find it, click Change, then put a new line at the bottom with the now-current date in the 'effective from' column. This way you keep a history of previous template setup.