Worksheet: Cash In Transit
Warning: advanced topic! You should be familiar with Statuses and Status restrictions before following this exercise. Feel free to call and we'll help you through it.
Here’s an example of an advanced workflow that can be implemented in GDS: Cash in Transit (CIT). A typical basic cash scenario might look like this:
A set of jobs is pushed to the officer’s PDA at the start of the shift. For each job:
- the officer arrives on site
- the officer collects bags of cash to be taken to the bank
- the officer leaves site
- the officer arrives at the bank
- the officer leaves the cash at the bank
- the officer leaves the bank
We can do more, but this is a good basic start.
To make this work, we need a new job type and event. If they’re not already present, add a job type ‘CASH’ and an event to go with it: ‘CITPICKUP’. This gives us the job classification so that GDS knows that it’s a CIT job. Where possible, it’s recommended that you use job types to define the general type of the job, for instance ‘CASH’ for cash in transit jobs, PATROL for alarm attendances and STATIC for static work. Then you can use event to refine things further, for example events for PATROL might be ACT (activation), FTS (fail to set), ESCORT (patrol escort) and the like. For CIT jobs we might have CITPICKUP for pickup, CITCHANGE for change deliveries.
Now we’ve got the job classification, we need to describe what can happen in it. Just like a normal job, we’ll go ONSITE to the job. We’ll need some statuses for what happens there.
Go into disposition maintenance and click on Restriction Groups. These are what we use to control which statuses occur in which types of job. Ensure that there’s a restriction group for standard jobs and another one for CIT jobs. Call them STANDARD and CIT.
Now, create a disposition for cash pickup called PICKUP (Pickup complete):

... and another one for the cash bag called BAG (Bag Scan):

Pickup will be in group DISPFINAL, as it’s the last thing we’ll do onsite, while BAG will be in group DISP. Put both in the CIT restriction group, as they both occur on CIT jobs only. The BAG state gets the special ‘scan for comment’ and ‘allow multiple entry’ boxes ticked. This allows us to have mutiple bags and prompts the PDA to start the barcode scanner to read the barcode on each one.
While you’re at it, you’ll want to check for any patrol-related dispositions (External check, Internal check, No Cause Found etc). We don’t want to see these in CIT jobs, so put them in the STANDARD restriction group.
Let’s enforce the restriction groups. Click on Status Restrictions and let’s have a look around.
GDS always applies the status restrictions in order, from top to bottom. The typical status restriction set starts like this:

... this allows us to OVERRIDE jobs if something unexpected happens. No matter what the current state of the job (start status group ANY), we’re allowed to OVERRIDE it. Some sites tick the ‘supervisor’ box at the end to ensure only supervisors can do this.
The 3rd line allows us to add LOG lines at any point in the job. LOG lines don’t affect the job or cause any problems so we can allow this.
Further down, you’ll see something like this:

This is the beginning of the status group section. This tells GDS which statuses can occur at which stages in the job. For example, it allows a NEW job to be stood down (SDOWN), or it can be dispatched (START). Once dispatched (START group) it can be stood down once again, or it can be confirmed. The status restrictions are obeyed by both the PDAs and the GDS job entry screen.
In between these two sections is the status restriction section. This tells GDS which statuses can occur in which jobs. We want to insert the following, if they’re not already present:

To do this, click on the first status group section line and press INSERT on the keyboard. That will give you a blank line to type into. Press the down arrow after typing the first line and then INSERT the second line as well. Your line numbers may differ, but that won’t cause any problems as long as the overall order is right.
The effect of the two lines we’ve added is to ensure that CIT job statuses are available only on CIT jobs. For any status in the CIT restriction group, GDS will skip the disallow line if we’re processing a CIT job. Otherwise GDS will fall through to the disallow line and therefore filter out the CIT statuses for non-CIT jobs.
Note that even if a status is permitted through this set of restrictions, it is then subject to the restrictions in the status group section. This is how we ensure that the CIT PICKUP or BAG statuses can only be used while the guard is onsite.
That changes so far allow us to go onsite for a CIT job, we can enter the bag details, report that we’ve completed the pickup, and the PDA will let us go offsite again.
You can test it out at this point by forcing GDS to reload the status configuration. GDS will do this by itself roughly every 30 minutes, but otherwise you can prompt it to do so by clicking View->System Status from the traffic screen.
Create a test client and a site representing a bank, and create a job with the test client as the main site and the bank as the 2nd site. Set the job type to CASH and the event to CITPICKUP.
You'll be able to step through this job within GDS itself: confirm it, go onsite, enter a BAG line representing a bag you've picked up, and then enter PICKUP to signal that the pickup is complete. Then you'll be able to go offsite. That's as far as we'll be able to go at this point, so leave this job open for now.
Now we need to handle the second half – arrival at the bank.
We need to create two new status groups, if they're not already present:
> DEST Destination group
>
> OFFDEST Offsite from destination
To do this, go into Status Groups and add the lines if they're not already there.
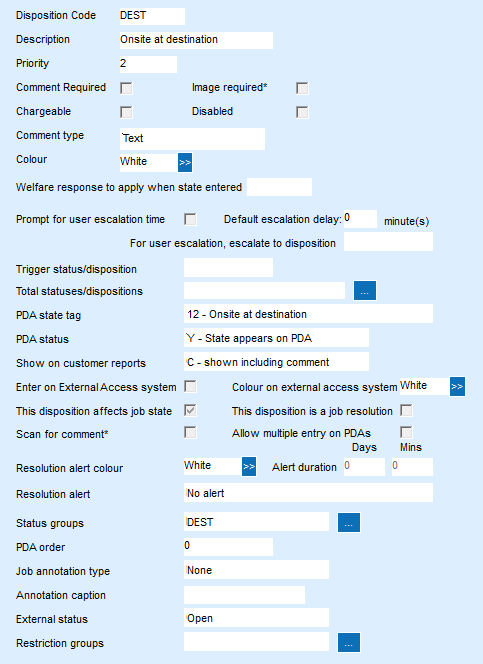
Next we need the dispositions for DEST (when we arrive onsite at the bank):
... and OFFDEST (when we leave the bank):
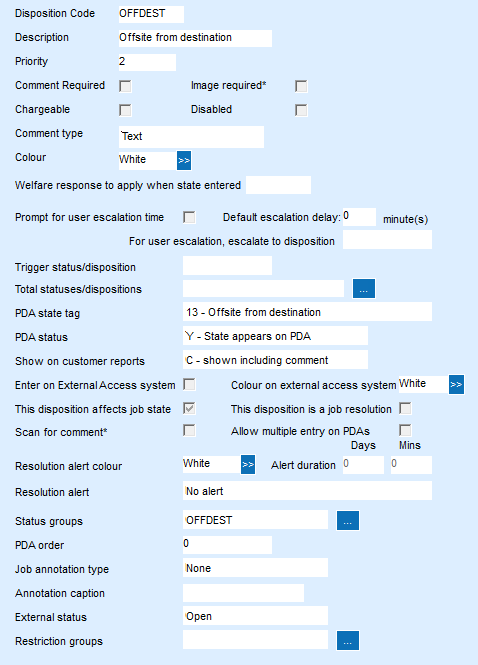
Note the special PDA state tags used which tell the PDA what's going on: "12 Onsite at destination" and "13 Offsite from destination". The PDA uses this to look for other jobs that also have the same destination so that it can offer to complete them all at once.
Finally, go back into Status Restrictions and insert these lines around the same place as the other OFFSITE lines:

... this allows us to go DEST after going OFFSITE. The PDA is smart enough that it will only allow DEST if a destination site (e.g. a bank) has actually been specified.
Go back to the traffic screen and do View->System Status to force the new restrictions to be loaded.
Assuming the test job you created earlier is still open, you should now be able to go back into it and go DEST, representing arrival at the bank, then OFFDEST and then finally NFA to close it.
As long as all of that works then you can try it on a PDA as well. Note that the PDA network can take up to 30 minutes to see your changes, and that the PDA only reads these settings as you log in. To play it safe, wait for half an hour, do a fresh PDA login and try it from there.