Interfacing With External Organisations
External Web Access
Other organisations can be given restricted access to your GDS system. They log into a special web portal that gives them the ability to look up their clients within your system and submit jobs for them. The advantage with this option is that it requires nothing more than a web browser at the external organisation, which virtually everybody has. The main challenge is that their operators or users have to be shown how to use it, and it may not be a time-efficient solution for them if they only have infrequent dealings with you. Where it can be used though it works very well and can save a lot of time.
To ensure that your External Access portal is active and to get the location your clients have to visit, contact Cave Rock support.
Once your External Access is online, you can give your partners access to it by going into Maintenance->Client/Customer->External Users. Click 'Add User' to add a new user:
Fields of interest:
- Username: the username they should log in as when using the web portal. By convention we encourage this to be of the form company.username: so a user John at ABC monitoring might get a username abc.john. This way you can easily see and group all of the users at the various organisations you deal with.
- Monitoring company: which monitoring company this user is associated with. This determines which clients they can see in the system - only clients tied to the given monitoring company will be visible to them.
- Additional access: if you have a monitoring company that is doing bureau-monitoring for some of your other partners, this user can be given access to other monitoring company clients
- External user group: determines what job access this user has - see External Groups below.
- User Access: determines whether a user can add or view jobs, and add or view clients.
- Monitor: the monitoring company this API user represents. They will be
- Dump/Template site: if the API user submits a job for an unknown client, GDS
- Allow welfare calls: enables the API user to access welfare calls, allowing it
- Allow item calls: allows the API user to access the item management calls
- Linked contact: a code for a contact that represents this monitoring company
- Raise alert if no activity: GDS will expect periodic calls from this API
- Require STATUS calls to keep alive: GDS will expect the external API user to
- Receiver: If defined, the external system is permitted to submit signals to
- details - the job details
- site\_code - the GDS site code
- ext\_site\_code - the external site code that we look up the site as
- ext\_job\_event - the external system event
- ext\_job\_type - the external system job type
- ext\_job\_source - the external system job source
- ^ - match the start of a line in the email message. Ensures that the text we match is at the start of a line, rather than accidentally matching some part elsewhere.
- \* - match an unknown part of a line. In the example above, we use it to match the sender address on the From line. We don't know or care what their name is, so we skip the name with the * so that we can check their email address.
- () - match the text in the brackets, and _mark_ the match. The first set of brackets will be marked as set 1, the next as set 2 and so on. (ABC\*XYZ) will match any piece of text starting ABC and ending XYZ, and will mark the block of matched text as set 1.
- to end of line: take the text from the end of what we matched to the end of the line. So if we matched 'Request ID: ' in the message above, then GDS will extract the reference number from the rest of the line. It won't include any of the matched text. Use this for single-line fields.
- To start of next field: takes the text from the end of what we matched all the way to the start of the next matched piece of text. If there are multiple lines in between, then these will all be extracted. If there are no further matched fields then GDS will extract all text up until the end of the email message.
- Following text: GDS will use the text in the next column rather than text from the email message. We use this in the example above to specify our own event types (NOISE or SMOKE) rather than use text in the email. In addition, if your text includes (1), (2) and so on then the marked text from the pattern match will be included.
When external users add or update clients, these updates do not show up in your database right away. Because updates from external users may not conform to your data entry standards, any changes are put into a queue to be approved by your operators.
You can set up the user groups under Maintenance->Client/Customer->External Groups. Here you can determine which types and
events external users can assign to jobs. You can also control what updates they are allowed to apply to jobs in progress by
selecting the job states they are allowed to use. Note that these job states must also have the 'Enter on External Access
System' checkbox ticked in Disposition Maintenance.
External System Link
GDS can link directly to other copies of GDS, and to some other systems. These
links can be used to both push jobs to and pull jobs from the external system.
To set up an external link, go to Maintenance->Client/Customer->External Systems.
External GDS
To set up an external GDS link, contact the operator of the other GDS
installation, and get them to set up an API username and password for you, as
described in the [API Users] section.
Once you have these, enter their GDS install code (typically a letter code) into
the GDS install code field, and enter the username and password.
If you are pushing jobs to their GDS, you don't need to fill in anything
further and everything will work. However you can optionally fill in
job source, type and event mappings that map your codes to theirs, in which
case these values will be pushed through to their system. If you don't do
this, general default values as defined in API User maintenance will be used.
If you intend to pull jobs from their GDS, then your GDS needs to know what
sort of jobs to create. At a minimum, fill in a default source, type and
event, along with a dump site which will be used if their site can't be found
in your system. If you also fill in mappings, GDS will map their values to
yours.
External API Users
External API users can be added to your GDS. This allows external systems to
access and update data within your GDS, subject to limitations that you specify.
When an external user sends us a new job, they can request that certain values
be applied to it. In particular, they can either specify the job type, source,
and event, or they can omit any of these and the defaults in the API user will
be used instead. If they do specify these values, GDS checks them against the
override list.
As an example, let's say a bureau monitoring company 'BureauMon' sends us jobs
on behalf of a number of smaller monitoring companies that they do monitoring
for. They can specify the job Source to reflect the virtual monitoring
company they're submitting the job for. Here's their API user entry:
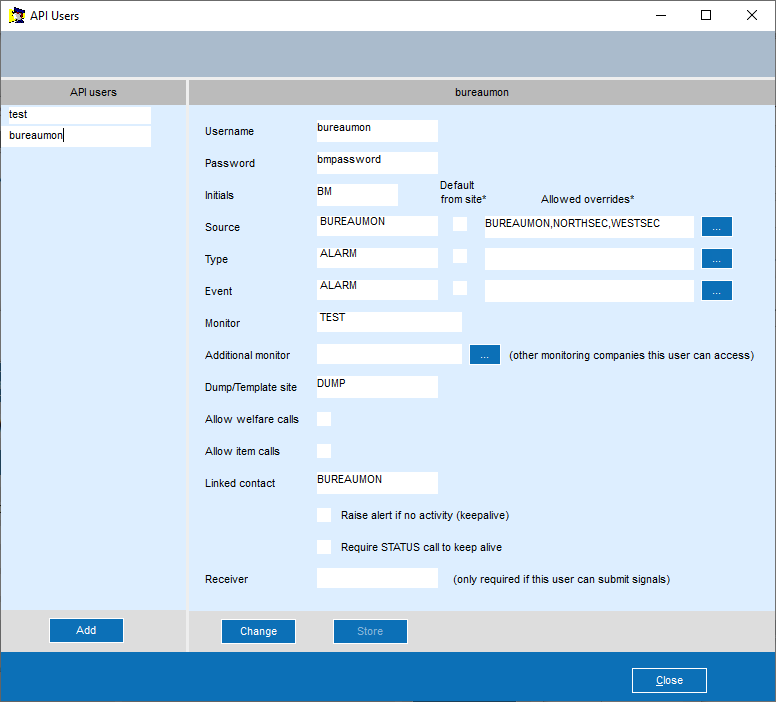
If they send us a job on behalf of West Security, they can either not specify
the job source, in which case GDS will use the default of BUREAUMON, or they
can specify a source code to reflect where the job came from, WESTSEC. As
long as the code they specify appears in the list then GDS will accept the job.
If, for example, they attempted to send us a job from East Security, GDS would
reject it as EASTSEC is not in the allowed list. If you want to allow jobs
from any source, fill in '\*' in the allowed list.
If the other organisation uses different codes to us, you can set up a
translation by using a lookup, like this:

Then we define a lookup, under Maintenance->General->Lookups, like this:
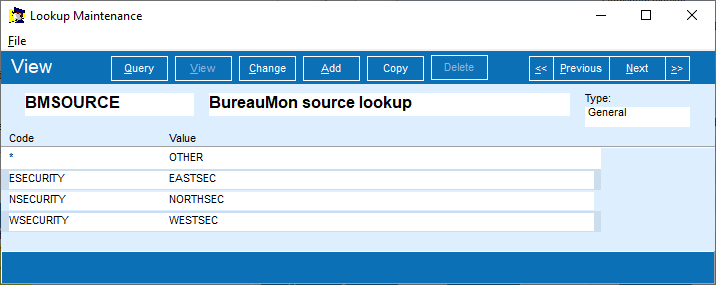
This means if the external organisation sends us code NSECURITY, the lookup will
translate it to our equivalent code, NORTHSEC. If it's not found, in the
lookup, GDS will reject the code.
As a special case, you can load a code of '\*' in the lookup code, and GDS will
substitute the value in that line rather than rejecting the code. So for the
example above, GDS will use the code 'OTHER' in place of any code it can't find
in the lookup.
You can use this to allow jobs from this list of security companies, and load
any job from anyone else with code OTHER. Setup the allowed overrides like
this:

The override lists and lookups for job type and event work in exactly the same
way as the job source example we've looked at.
Other fields in the API user setup:
allowed to access clients tied to this monitoring company, and to the
monitoring companies listed in the 'Additional monitor' list. If they try to
access a client that isn't permitted, GDS will pretend the client doesn't exist
and log an error to the API log.
will use this placeholder client instead
to process checkins or trigger panics for guards by callsign
or API user. The simplest way to create such a contact is to create a client
that represents the organisation you're dealing with. GDS will automatically
create a contact with the same code for you to link to.
user. If it doesn't see them, it will report a system failure to the operators
make a special 'status' call to our API to report its health
us using the 'signal\_new' API call. Any signals received will be attributed to
this receiver.
Patriot ODBC
GDS can read and create jobs from activity occurring within the Patriot monitoring system. To do this, you need ODBC access to the Patriot SQL Server database.
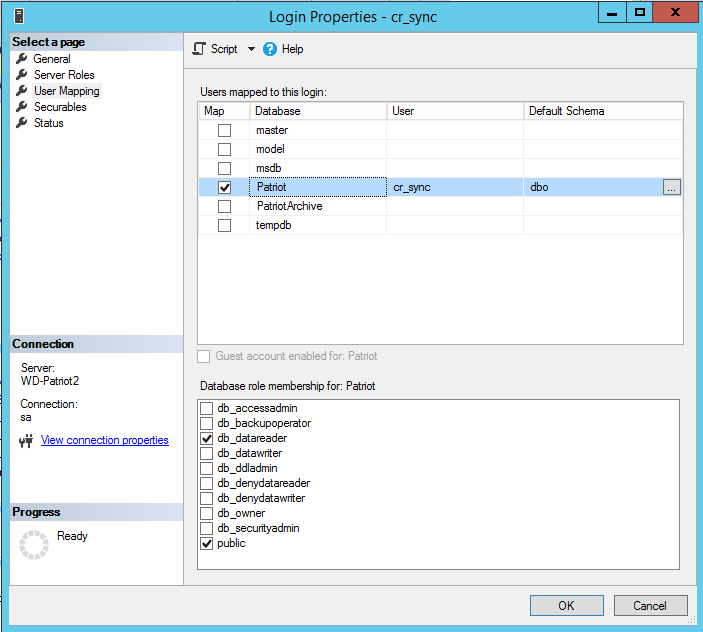
To do this, install a recent copy of the 32- and 64-bit SQL Server ODBC drivers
from the Microsoft website onto your GDS device server. Use SQL Services Manager in the Patriot SQL database to create a new 'cr\_sync' user at the global server level, and assign this user a password. Then assign it the db\_datareader role on the Patriot database by right-clicking on the user, clicking User Mapping, selecting the Patriot line and clicking db\_datareader in the list at the bottom.
Next, set up the ODBC connection. Search for odbcad32 and run 'ODBC Data Sources (32-bit)'. Click Add, then choose the newest ODBC driver for SQL server shown. Fill in the name 'Patriot', a description, and for the server enter the server name of your Patriot SQL Server installation. On the authentication page, choose 'With SQL Server authentication...' and enter the cr\_sync username and password created previously. On the next page, tick and select to 'Change the default database' to 'Patriot'. It shouldn't be necessary to change any other settings in the wizard until you get to the Finish step.
Once you get to the Finish step, a summary of the details appears, along with a button to 'Test Data Source'. Be sure to do this, and ensure that the 'TESTS COMPLETED SUCCESSFULLY!' line appears in the output.
Once this is done, you can set up the external system in GDS, in Maintenance->Client/Customer->External System Maintenance. Fill in the ODBC username cr\_sync and its password into the Username and Password fields. Fill the Patriot ODBC name ('Patriot') into the URL field. Fill in a default job source, type and event, and also a dump site to put unknown clients to. Check the option to 'Pull jobs from remote system', and uncheck the Push option.
You may optionally set up mappings for the type and event. GDS will map Patriot's Action Plan ID to the external event, and Patriot's TypeNo to the external job type. You can set up a lookup in Maintenance->General->Lookups with the Patriot Action Plan ID in the Code field, and the GDS event code in the Value field. Likewise for type put Type No. in the Code field, and GDS's job type in the Value field. You can choose to use both of these lookups or only one of them. The Action Plan lookup will generally be the most useful one.
For receiving subsequent updates from Patriot, define a Response in Maintenance->Job->Response. When looking for a response to apply, GDS tries 3 combinations of response value:
P\_(alarmtype),P\_(signaltype)
P\_(alarmtype)
\_C or \_O (for job open or closed)
To further customise the Patriot integration, you can specify a data mapping. Fields available in the data mapping are:
The above fields are available to the data map. In addition, the data map can
access fields from the SQL event query. The default query is:
```
SELECT Client\_No, Client\_Name, TypeNo, ALM\_Description,
IDActionPlan FROM Attend WHERE AttendId = %id
```
... you can replace this by putting the new query into the sql\_query setting
in the external system configuration.
Configure an Email Reader
GDS can be configured to read incoming email messages from other organisations. It can process these email messages and use them to automatically create new jobs or update existing ones.
Before we begin, let's start with one word: DON'T. If you can automate using another method then do so. The best automation method is using the GDS API (but it's also the most work getting it up and running). After that, using the External Web portal works well, if it suits the workflow of the other organisation.
If none of these are appropriate then the email reader can be used. It works well enough, but the big issue is that it's sensitive to changes in the format of the email we receive. If the sender changes the layout then there's a good chance the rules we define here won't understand the new layout and the read will fail. This will most likely happen on a Friday afternoon when the people that can fix it have left work for a long weekend. You have been warned!
To configure the mail reader, bring up the Mail Fetch configuration window. It can be found under Maintenance->Job->Mail Fetch.
To begin with, you need to tell GDS which mail server and account to fetch from:
GDS can read from multiple servers or accounts - add a line for each.
GDS will periodically poll each account listed here, and read any email messages that it finds. Normally it will delete each message after it has been read - this is recommended. Otherwise GDS can be configured to only delete messages it successfully processes, or to never delete messages.
Note that if you don't select the 'Always delete' option, you'll need to ensure this email account is checked and cleaned out some other way, as the messages that GDS doesn't delete will accumulate and fill the mailbox.
Let's look at an example email message we want to read:
```
From: Dullsville CC
Subject: New request CR19220
Hi Cave Rock Security Ltd.,
A new job has been assigned to you.
Request ID: CR19220, time 23:21
Request Type: Noise
Full Details: Noisy stereo with excessive bass
Address: 1313 Nowhere Street, Dullsville
Thank you
Dullsville City Council
```
This message has a number of fields we want to extract. On the second tab of the Mail Fetch Configuration window, we can tell GDS how to read this message:
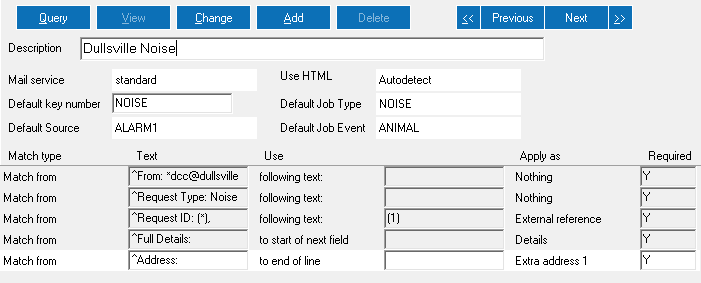
This mail fetch template recognises the sample message above and extracts details from it.
Each type of message you'll interpret should have an entry here - use the standard Add/View/Change buttons to maintain the records for each message type. Default job details are supplied in the top panel, and a set of matching rules appear at the bottom.
For each matching rule, we either tell GDS to look for some text in the message (match type 'Match from'), or we tell GDS that it can process the rule in every case (match type 'Always'). Most rules will be looking for text in the message.
For each of these, the rule is either Required (Required='Y'), or optional (Required='N'), or in a group (Required is a numeric digit 1-9). All Required rules must match an incoming message, otherwise GDS will decide that the email message doesn't match this template. For rules that are in a group, GDS expects at least one of these rules to match. In the above example, we're expecting that we'll get either a Noise or a Smoke request type line, but not both. As long as we see at least one of them then GDS will accept the job.
The text field tells GDS what text to look for in the email message. Some characters have special meanings:
The Use field tells GDS what text to use in the rest of the rule. The options are:
The apply as field tells GDS what to do with the text. In some cases you simply wish to ensure that the text is present, or to mark the end of a multi-line field, in which case you can choose 'Nothing'. Otherwise you can specify which part of the job you wish to modify: you can change the default job, type, event, details, site code or any of a number of other items.
A special apply as field is 'Update type'. This can be set to ADD to add a new job, UPDATE to update an existing job, or IGNORE to ignore this mail message. If no update type is specified, the system assumes you are ADDing a new job.
The third tab allows us to test the mail reading configuration:
To use it, select the mail service from the dropdown at the top, then click the 'Open' button. This will cause GDS to connect to your mail server and display the first message there (if any). You can step through the messages, and also delete them if necessary.
To test a message, either open the mail account as above and select a message, or copy and paste a message from another source into the top text box. Then select a message profile from the dropdown in the middle and click the Test button to begin.
GDS will will either match the message (and output the fields it matched), or it will tell you which rule line(s) failed.
Virtual Receivers
Virtual receivers allow GDS to send signals to external monitoring systems.
Send welfare level signals to external monitoring company
GDS can transmit signals to an external monitoring company when the welfare alert level changes.