Basic Customisation: Job Templates
About Job Templates (Quick Jobs)
Quick Jobs can be used to create shortcut keys or buttons for creating new jobs
with pre-filled details. A Quick Job template can automatically fill in the
job type/event/source, the site the job is for, and it can also pre-fill
information in the details box.
Job Templates are also occasionally used in other parts of GDS. If a part of
the system is creating a job for you, you can sometimes specify a job template
to show GDS what it should look like.
An example of something you might use job templates for is a noise control job
for a particular Council: by pressing one key, GDS will fill in the council
site code, the type details, and it can pre-fill the details box with prompts
for what we should ask the caller for.
Using Job Templates
To use a Quick Job Template, begin adding a job as normal by clicking 'Add Job'
from the traffic screen. You'll see the normal new job screen, and you'll
notice the Quick Job buttons below.
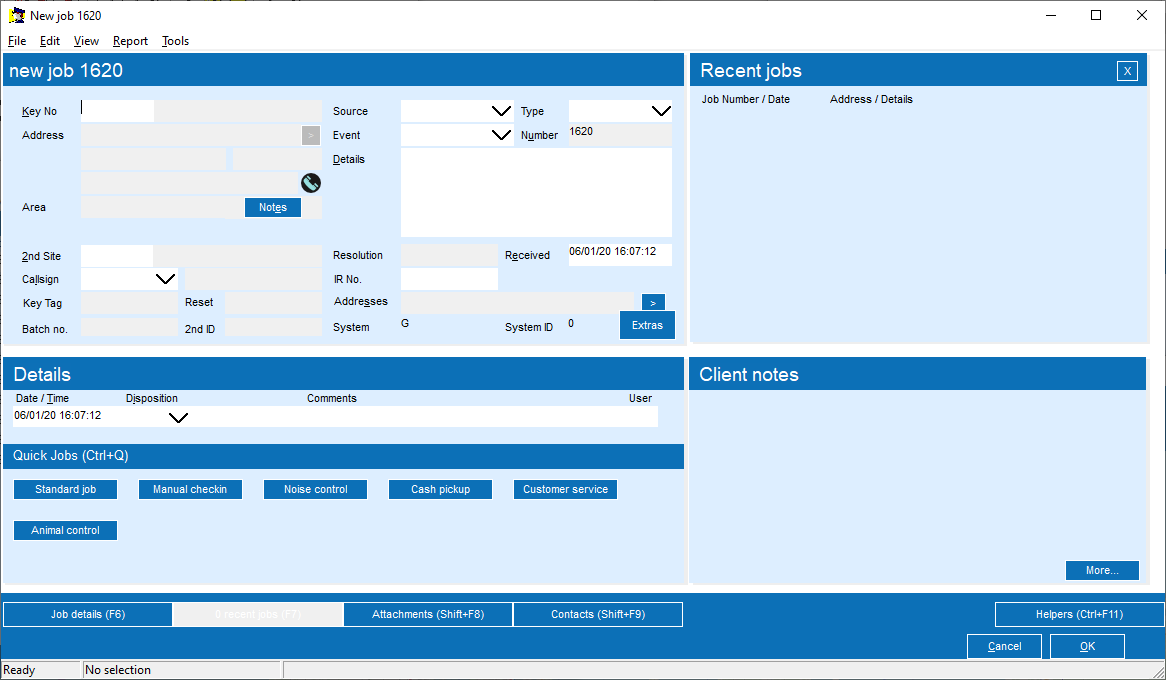
Don't worry if you can't see any yet. It might be that none are defined in your
system - we'll cover how to set them up next.
If you do have job templates defined, you can either click on one right away,
or you can activate the keyboard shortcuts by pressing CTRL+Q: If you do this
you'll see things change:
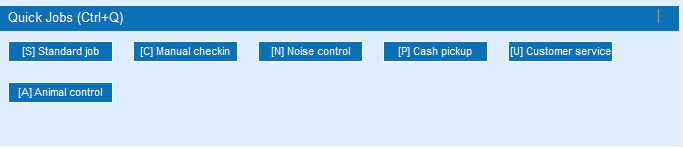
Now pressing the given key will activate the template - for example, to create
a standard job, you'd press S.
Another trick is that you can actually activate quick jobs from all the way out
in the main traffic screen by pressing CTRL+Q. For example, while in the
traffic screen, press CTRL+Q, then A to create an Animal Control job.
Creating Job Templates
To set up a Job Template, go into Maintenance->Job->Job Templates:

To add a new template, click in the blank line at the bottom, fill out the
details, and press the down arrow to store it.
Each template has a code and a description, in typical GDS fashion. The next
item is a _Key_. This is optional, but if present it specifies the shortcut key
that users can trigger this template with. The source, type and event are used
to fill in the equivalent fields in the job.
The Default Site field is optional. If filled, this is the site that the new
job will be created for. Otherwise when the new job is created, the user will
be expected to specify the site code as usual.
The Details field is what is pre-filled in the details field in the job. While there's only room for one line here on this screen, you can actually specify multiple lines of text by putting the 'magic' bit of text \\n in there. So
something like this:
````
Name:\nPhone number:\nAddress:
````
... would come out in the job itself like this:
````
Name:
Phone number:
Address:
````
... all ready for the user to fill in the required details.
Start status is what status the job should start in. Typically you'll choose
NEW for a new job, but if it's one that needs to be dispatched to the guards
right away, you might have UN TP instead. You'll see one of the examples shown
actually has NFA - this is for a job that is created and closed immediately,
used for recording an event that requires no further action.
The Order number on the end is used to determine the order in which the
shortcut buttons appear. Lower numbers appear first.