Billing and Accounting
GDS allows you to track and charge for the work that you perform for your customers.
Services
Virtually all customer charging originates from the details in the Services panel in Client Details. The Services panel lists a line for each 'service' that we are performing at a particular site. A service represents a service we are performing for a customer, for example, alarm responses, monitoring or patrols. You can also add service types for any other service that you perform for your customers.
In the example below, we're performing monitoring (MONITOR), scheduled patrols (SCHEDULED) and alarm response (RESPONSE). Note that the response service is no longer active as the End date has passed.

Each service also represents something that we may charge our customers for. Services can be charged for in two ways: on an Occurrence or Subscription basis. You can also have a service with both types of charging active at once.
Occurrence-based charging is where we charge for each job or work item that we perform that falls under that service. An example might be a guard callout to an alarm activation. We'll charge for each callout, possibly based on the amount of time the guard spent attending to the callout.
Subscription-based charging is where we charge a time rate for the entire period that the service is active. An example might be alarm monitoring, where we'll charge an monthly or annual fee.
When calculating how much to charge for a service, GDS looks in several places. Initially it looks in the rate columns in the Services panel in Client Details. If it finds no rate defined there, it next looks in the Service Rates panel in Customer Details.
If you have negotiated a rate for a customer that has multiple sites, you'll want to put those rates in the customer record as opposed to the individual client/site records. This way if you need to modify those rates in future, you only have to do so in one place. Equally, if you add another site for that customer, the site will automatically use the correct rates - there's no need to re-enter them for each new site.
If no rate is specified in the customer record, GDS next looks at the Service Rates panel in Area Details. This allows you to set up different rates for different regions that you patrol. This can help you reflect different cost structures that might result from working in these different areas. An example might be that you have a contractor handling work in one area. You can set default rates for that area that reflect the costs that you pay to that contractor.
Finally, GDS looks for rate details in the Service Maintenance window (Maintenance->Client Servicing->Service Maintenance). These rates will be applied across the entire system, where no other rates have been defined.
When defining rates throughout the system, we use a 'rate code' rather than a direct dollar value. We do this so that adjusting the rates in future is easier: rather than altering standard rate for a service from $10 to $12 in every place that it occurs, instead we create a rate code (say 'STANDARD') and use it in the appropriate places. Then when we need to increase the rate, we go to rate maintenance, where it is defined, and change it there.
One thing you'll want to be aware of is the classic tug-of-war between your sales people and the operational team: sales will tend to create custom rates for individual clients, while operations would prefer that all customers be charged at the same rate.
In practise a compromise is generally arrived at. We recommend that a set of standard rates be defined, e.g. 'STANDARD', 'DISCOUNT1', 'DISCOUNT2' and the like - and encourage the sales people to pick the closest one when arranging a new contract. This allows you to keep the number of prices under control, so that none are missed when the time comes to change them.
Rate Maintenance
Found under Maintenance->Client Servicing->Rates, this is where you define the values of the rate codes used elsewhere in the system for charging.
Each rate has a rate code and a description, and this screen also offers a button ('List usage'), that you can click to see where in the system any particular rate is being used.
At the bottom of the screen is the details area, where the actual dollar values can be entered:

Here you define a dollar amount and what it should be charged for. In the first line in the example above, we're charging $40 per 30 minutes or part thereof. This dollar amount is generally what is transferred to your accounting system. Generally it'll be tax-exclusive.
You can also specify a start date for each rate. In the example above, we charge $40 per 30 minutes (or part thereof) from 1st of May 2013, and $45 from the 1st of May 2014 onwards. Using this section, you can specify rate changes that occur in the future. In fact, GDS will typically insist that you do so, as changing rates retroactively makes things difficult from an accounting perspective!
You can specify rate breaks. Here's an example:

Here we charge $45 per 30 minutes (or part thereof), but if the job runs for an hour or more, we charge a base rate of $90, plus a discounted rate of $40 per 30 minutes (or part) after that first hour. The rate break quantity specifies the minimum duration for which the break applies, the base amount is the amount to charge for that minimum duration, then the dollar amount is charged for time periods above that minimum duration.
Note that if you have rate breaks and multiple dates, GDS applies some basic rules to work out which entry to use.
It starts putting everything in order of date and then rate break - later dates always appear last. Then it chops off the entries that don't apply yet. This way you can enter future dates and they'll be ignored until the correct time. After that, GDS starts at the bottom of the remaining list and works its way upward. The first entry it finds that matches is the one it will use.

In the example above, if you have a job for 34 minutes on the 12th of December
2019, only the top two lines will be in effect as the year 2020 hasn't started
yet. GDS will start at the bottom of the 2019 lines, see that 34 is above the
rate break of 30, and apply the $25 base plus $1/minute = $4 for a total of
$29.
For a 34 minute job occurring on the 5th of January 2020, the 3rd line
will now be active. Once again, GDS will start at the bottom, and this time
the 3rd line will match. 34 is above the rate break of 0, so GDS will charge
$30 per half-hour or part thereof. 34 minutes is half an hour plus a part of a
second half-hour, so GDS will charge $30 x 2 = $60.
Another thing you'll find on the Rate Maintenance screen is a checkbox: 'Omit this item if calculated value is zero'. If ticked, and if the value of the charge works out to zero, then GDS will not export this charge to the accounting system at all, and no invoice will be generated. If it is not ticked, GDS will export the value to the accounting system regardless, even if it is zero, potentially resulting in a zero-value line appearing on the customer invoice. There will be situations where each of the two options are appropriate.
Rate Diversions
What we've seen so far allows us to charge amounts based on the quantity or duration of an item or job. With jobs in particular, we can also vary how charging is performed based on various criteria in the job itself. We do this using Rate Diversions.
An example in a typical guard dispatch scenario is that we might receive a job, and shortly thereafter it will be 'stood-down', effectively canceled. This might happen because we've been dispatched in error or because the staff on site have accidentally set off their alarm and finally called in to Comms to say that everything's OK.
In the stand-down situation, typically we won't charge for the job if the guard has not yet arrived on-site. We might also insist that the stand-down be called in within a certain time period (say 10 minutes).
To set this up, we first create a rate called 'ZERO', and set up a rate of $0 per 30 minutes. Any job processed at this rate will be charged $0. What we'll do is tell GDS to divert any jobs to this zero rate if the appropriate conditions are satisfied.
To do this, we find our standard job charge rate and then click on the 'Manage diversions' button in the middle of the Rate Maintenance window. This brings up the 'Divert rates from...' window, where we can tell GDS about the diversions we need.
Click 'Add new rule', and we'll be prompted for the details of the diversion. First, GDS needs to know the date range for which the diversion will apply. By default, GDS will set the diversion to run from midnight tonight for the forseeable future; you can change these dates to apply from a different date, and you can also make the diversion temporary by specifying a different end date.
Once again, you'll find that GDS won't be keen on letting you specify retroactive diversions as the jobs that would apply may have already been processed. But you can tell it to make a diversion active as of right now by typing a dot ('.') into the from field (the dot can be used in most date entry fields as a shortcut for 'now').
Next, you specify the rate code that we want to divert to. In our example, we're diverting from our job charge out rate to our ZERO rate, so we'll fill in ZERO here.
Finally, you specify the conditions that you want to be checked for the diversion to apply. For a diversion to apply, all conditions here must be satisfied. Here's what we set up for our stand-down diversion:
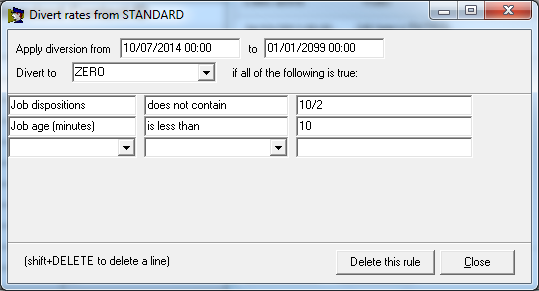
This tells GDS to divert if the job is less than 10 minutes old, and if the job does not contain a '10/2' code (our code for 'officer onsite'). If these conditions are not satisfied, the diversion is not applied and the job is processed at the normal rate.
Diversions can be used for all sorts of other things too. You can charge different job types at different rates, or based on the time of day or day of week, or the officer that did the job.
On the Divert rates window, you can test your diversions using jobs already in the system. Enter the job number in the 'Test job number' field, click 'Test', and GDS will give you a transcript of the checks that it makes and the rate code that it arrives at. You can also have GDS test future or historical diversions by entering a different time in the time field above - GDS will pretend that your test job actually occurred at that time instead.
One other thing: you can create chains of diversions. If a diversion is applied and the job is diverted to another rate, this new rate may also have diversions loaded against it, and these diversions will also be processed, possibly resulting in a diversion to yet another rate.
Sharing diversions
Diversions are normally loaded against individual rates. But often you'll want to have several different rates in the system, all of which share the same set of diversions. For example, you may have a standard rate that you charge most customers for jobs, but a large customer may have negotiated a discounted rate.
This large customer might still need the same diversion set as your standard customers. Rather than re-enter the diversions for each and every rate, you can have the discount rate check the diversions on the standard rate by checking the 'Check default diversions after these ones' check box in Rate Maintenance. If checked, GDS will first check any diversions on the rate itself, and then any diversions on the default rate specified, before finally accepting and charging at the discount rate.
If the 'Default rate to check' value is blank, GDS will check the diversions on the default rate for the service we're charging for. So if this rate is being processed as a part of an alarm callout (typically the RESPONSE service), GDS will check the diversions under the default rate for the RESPONSE service. As a result, you'll typically set up most of your diversions on the standard rate for any of your service, and most other rates you charge will incorporate those diversions automatically.
For example, if we have a discount rate called DISCOUNT that has the 'check default diversions' checked, GDS will first check any diversions on this DISCOUNT rate:
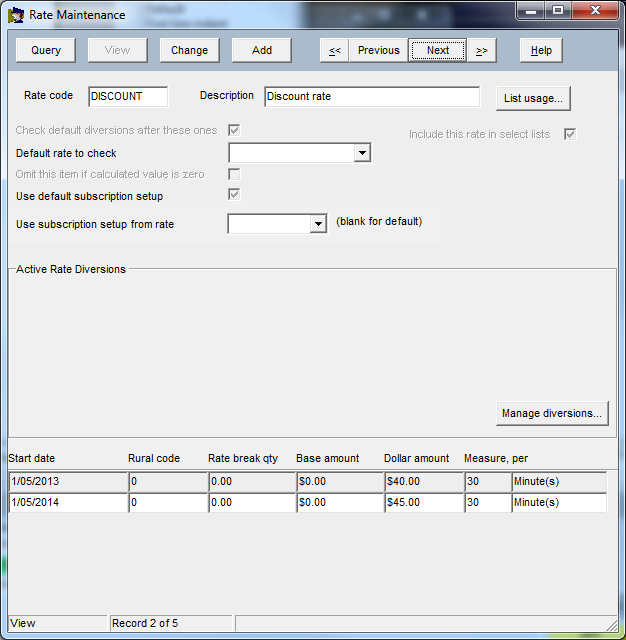
If none of them match, or there aren't any (as in this case), GDS will look for the 'Default rate to check'. There's none specified here, so it will look at the default rate for the service:

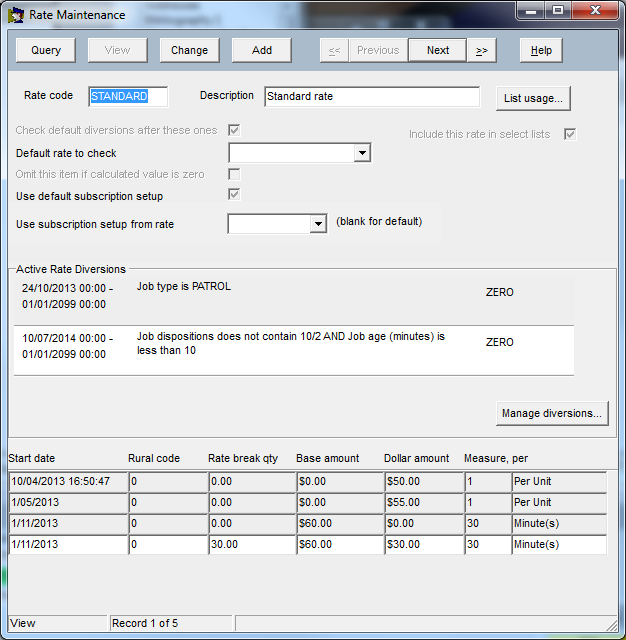
... that rate is STANDARD, so GDS will process the diversions it finds in the standard rate:
Subscriptions
Rates can also be used for subscription charging. Where a rate is specified in the subscription column in a service, the rate will be applied for the entire period for which the service is active. Typically you'll charge on a daily, monthly or annual basis for these, though you can charge on any other basis if you wish to!
There are several settings in Rate Maintenance that help with managing subscriptions. Most of these will only show if you turn off the 'use default subscription setup' tickbox:

There are two time periods involved with subscriptions: the billing period and the subscription cycle. The billing period is the unit of time you charge for: a day, a week, a month or a year. The subscription cycle is how often you want the system to process the subscription charges.
For example, you might have a client that you bill on a per-day basis at $10 for each day for which a service is active (billing period). But they only want to be invoiced once a month (subscription cycle). For this client you'd typically set up the subscription cycle to be one month long, starting on the first of the month, and you'd set up the rate to be charged at $10 per one day. GDS will then charge out the accumulated days at the end of each month.
The charge dropdown changes the basis on which customers are charged: services can be charged for in arrears or in advance, and you can choose to charge only whole amounts (say for a daily service where you charge for complete days only), or you can pro-rata charge, where GDS will charge the proportion of the period covered (for example a monthly subscription starting halfway through the month would be charged half the standard amount).
For most situations you'll want to set these up in only one or two rates much as you do for diversions above. In the same way as diversions, you can then have all of the other rates refer to the settings in the main rates.
Accounting Batches and Export
GDS can use the service and rate calculation engine to work out what to charge for jobs and subscriptions. Before we can export them to an accounting we want to 'lock' the current values in place, so that if we're tracing them in future we can see where they came from.
In a similar way to many accounting systems, GDS has a concept of accounting 'batches', which we use to ensure that each thing is charged for once and only once. The place where we do this is in Post Batch Maintenance, found under Process->Accounting Batches.
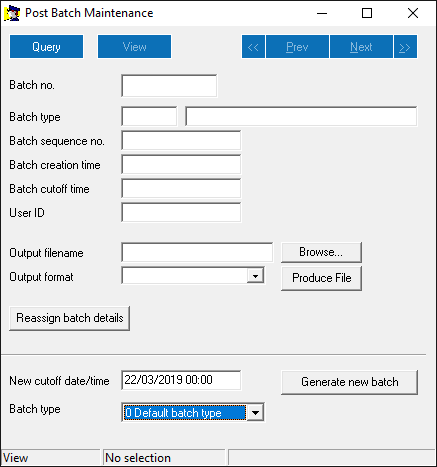
The window is split up into two parts. The top part is for viewing and exporting batches that are already in the system. The bottom part is for creating new batches. When creating a new batch, the system needs only two pieces of information: the batch type to create, and the cutoff date.
The batch type determines which jobs and subscriptions will be charged for in this batch. You can use it to create batches that only capture certain job types, or charges that are only meant to happen at certain frequencies (eg monthly), or for certain customer types. Initially the system comes with just one batch type, which captures all chargeable activity.
The cutoff date determines the time period we are capturing data for. Only jobs started BEFORE the cutoff date will be captured in the batch, and only jobs that are closed will be captured in the batch. Each job or subscription item can be added to one batch, and once it has been put in a batch it stays there forever. This is how we ensure that each chargeable item is captured only once.
Once a batch has been created by clicking the 'Generate new batch' button, the system will show its details in the top panel. You can also search for previously created batches in the usual way.
Each batch in the system has a unique number - the batch number. This number is unique across all batch types in the system. Each individual batch type also has a sequence number, which numbers each batch of that particular type.
GDS knows about a number of different accounting systems, and can produce a file tailored to each. Importing this file into the accounting system will generally give you a draft invoice batch that you can use to generate your invoices.
To export the batch data to your accounting system, find the batch you want to export, select the correct accounting system type in the 'Output format' dropdown, then specify a filename to export as (or click 'Browse'), and finally click 'Produce File' to produce the output file itself.
Custom Export Format
In addition to the built-in accounting system formats, you can also specify a
format of your own, the 'Custom' format. This can be selected from the
'Output format' dropdown in Post Batch Maintenance as described above.
To teach GDS about your new format, from the Traffic screen go into File->System Options, then select Accounting Integration on the left. You'll see something like
this:
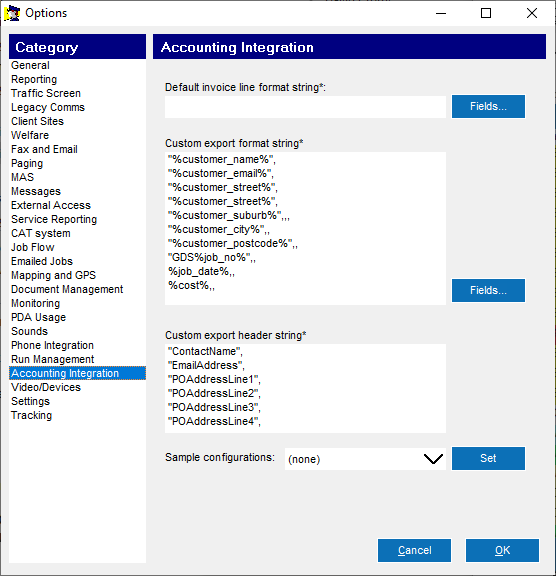
When creating its export, GDS produces what is effectively a spreadsheet. It
starts with a header line, which is described by the 'Custom export header string'
box, then adds an export line ('Custom export format string') for each chargeable
item.
You can see some examples of existing formats by selecting one from the
'Sample configurations' drop down and clicking 'Set'. Note that this overwrites
your existing settings, so if you're just looking, don't forget to click Cancel
on the dialog so that your changes aren't saved.
GDS has a number of sample formats built-in, and one of these may well work for
you as-is. But if they don't, you can take one of them as a starting point and
tailor it from there.
Each export line is made up of a series of fields. You tell GDS which fields go
where by specifying placeholders. GDS replaces each placeholder with the value
it represents. For example, the %job\_no% placeholder will be replaced with the
job number of the job, %job\_date% will be replaced with the date of the job and
so on. You can see a list of the placeholder options by clicking the 'fields'
button to the right. Selecting one of the placeholders from the list will add it
to the end of the format string.
Export files are usually either CSV (comma-separated) or TSV (tab-separated) files.
You enter these as a part of your format strings: for CSVs put a comma between
each field, and for TSVs put in \\t, which represents a tab. Other special
characters are \\r for carriage return (CR), and \\n for new line (LF). GDS
automatically puts a CRLF at the end of each line, but if you need another line
break you can add them yourself using these codes. For arbitrary ASCII codes, you
can specify them in hex with \\x on the front, for example \\x7F yields ASCII 7F
(DEL).
When specifying formats, you can include line breaks to make things easy to read.
They won't appear in the final output. Only control codes specified with the
sequences above will appear.