Basic Customisation
Now that we've been through a basic job example, we can look at ways to make the job flow better suit your business setup.
Job Statuses
For the typical dispatch scenario the most common change you'll need to make is to add more job states/dispositions so that we can describe more about what happened in a job.
Let's look at the states in that sample job again:
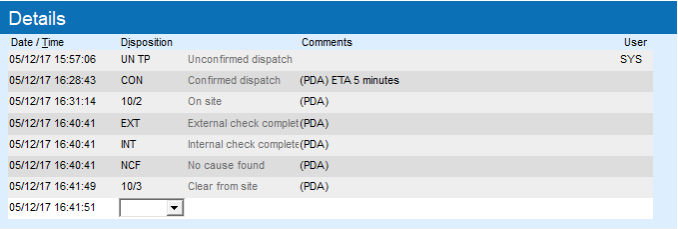
The states tell the story of what happened in the job. First it was sent to the PDA (cellphone), then it was confirmed by the guard and an ETA provided via the GDS app on the cellphone. The guard went onsite, performed some tasks, then went offsite again. Finally the job was closed.
Each job status has a status code: UN TP, CON, 10/2 and so on. Often you'll use similar codes when talking with your field officers. The important part here is that your operators will type these codes when updating jobs - we use them as they're a very fast way to tell GDS what happened next in the job.
Things to consider when creating new codes:
- Keep them short
- Try to use existing codes in GDS if they're already present. That way if you recruit staff who have used GDS before they'll hit the ground running
- Try to make codes unique after one or two letters
- when you start your copy of GDS up;
- at random intervals (approximately every half hour); and
- when you view the System Status screen.
...that last one merits a little more discussion. When typing in a status code, GDS tries to guess which status code you're after based on what you've typed so far. So if you had two codes: SECTIME and SECTION, then GDS wouldn't be able to be certain which you meant until you'd typed 6 letters (SECTIO or SECTIM). For infrequently used codes this doesn't matter too much, but if it's one you use a lot then try to make them unique after less typing. You can do this by changing the word or code, or a trick some use is to put a prefix on the front, say changing SECTIME to ZSECTIME. That way it's unique after only two characters, so quicker to enter.
At the end of the day though, you control the codes that are used, and you're able to add any codes you choose, or even modify the existing ones so that they better suit the terminology you use within your business.
Another thing to be aware of is that GDS knows that certain status codes should appear at certain points in the job. We won't go into detail here (it's covered in full in the Disposition Maintenance chapter), but for now it's enough to know that statuses are divided into status groups, and these tell GDS when a status may be used.
Let's check out disposition maintenance: from the Traffic screen, click Maintenance->Job->Disposition. You'll see something like this:
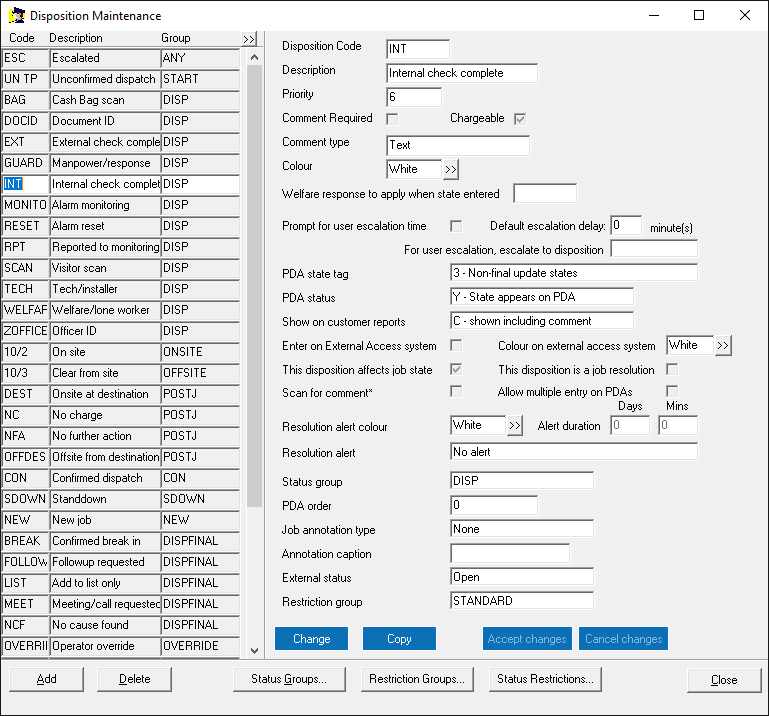
Down the left are the available statuses. You can click the column headings here to sort them, and click the little arrows at the top right to change between showing the status group and status priority. Click it so that it's showing the status group, then click the 'Group' heading so that everything gets sorted by group.
The groups we are interested in right now are 'DISP' and 'DISPFINAL'.
The DISP statuses are those that the officer can choose from (or the operators can add to the job) once the officer arrives on-site. There can be any number of these as the officer performs the various checks and tasks at the site.
The DISPFINAL statuses are those that represent the primary outcome of the job. Normally only one of these will be chosen in a job.
Let's create a new status: STAFF, for Staff On Site. This is generally a final disposition as it represents the outcome of the job, so it'll be a DISPFINAL status.
The best way to create one of these is to copy an existing status, so click on the BREAK status on the left, then click the Copy button down near the bottom of the window. Click in the Disposition Code box and change it to STAFF, and in the Description box type 'Staff on site'. Make sure the Comment Required box is ticked. This will force the officer or operator to type some text whenever this status is used – generally they'll type the name of who it was they found on site. Then click the 'Accept changes' button near the bottom and your new status will be stored.
Let's create a new non-final disposition too: DOOR, or Door Insecure. This won't generally be the direct cause of an attendance, but something that we'll often find along the way. Take the existing INT non-final disposition and copy it, changing the code and description as before. Then click Accept changes to finish.
Now that we're done here, close the Disposition Maintenance window and return the the Traffic screen.
System Status and Refreshing System Data
We'll do a little trick here: on the Traffic window, click View->System Status. You'll see the system status window:
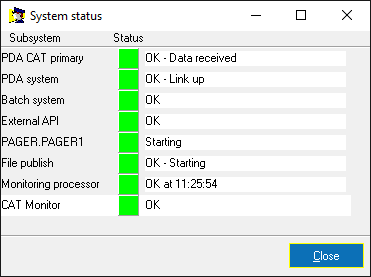
This is useful in itself, as it shows you the various modules of GDS and that they're running correctly. If something is awry it's your first port of call to see what's going on. As long as everything is green then we have no problems; a red indicator represents a failure that should be addressed.
But something else happens in the background when you call up the System Status screen: GDS re-reads some core settings from the database. It reads these settings:
We do this as some settings and information are used so frequently that if we looked them up in the database every time we used them the system would slow down. They generally change only very infrequently so there's little point in re-reading them all the time – instead we hold them in memory, making things faster.
The only downside is that if we make a major system change, GDS won't always see it right away. Most of the time this doesn't matter too much as changes like this generally involve new projects or work that we're undertaking, so they aren't needed right away, and all of the GDS instances will see them within the next half hour anyway. But if you're testing something new then it's helpful to give things a little push by viewing the System Status screen.