Reporting
GDS has a number of reports that can be generated for both internal and external usage.
Running custom reports
GDS's core reporting module is accessed from the traffic screen by clicking Report->Show Reports.
In the report screen, you can run a report by selecting the report from the list on the left, filling in selection criteria on the right and then clicking the 'Generate Report' button at the bottom. Reports can also be scheduled to run at a later time and also to repeat automatically - see 'Report templates' and 'Scheduling reports' section below.
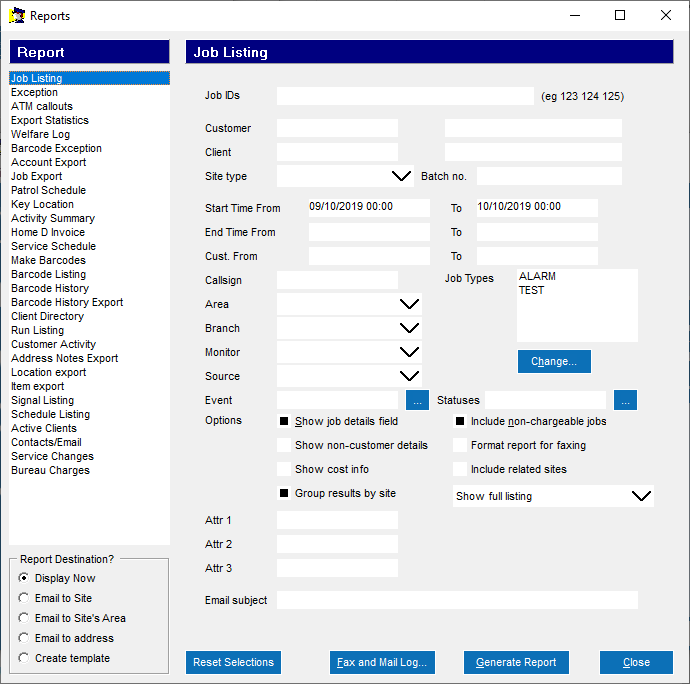
To view a report immediately, select the report on the left, fill in the criteria on the right and click _Generate_ below.
Report templates
The most common task you'll have with reporting is setting up a new regular report for a new or existing customer. You'll likely have a small set of standardised reports that will satisfy most customer needs. We use Report Templates to tell GDS what these are and to make them easy to assign to clients.
To add a regular report to an existing client, head into Client Details (CTRL+F8) and locate the client in question. Click the Reports entry in the Page list on the left (F12, R) to see the existing reports that are scheduled:
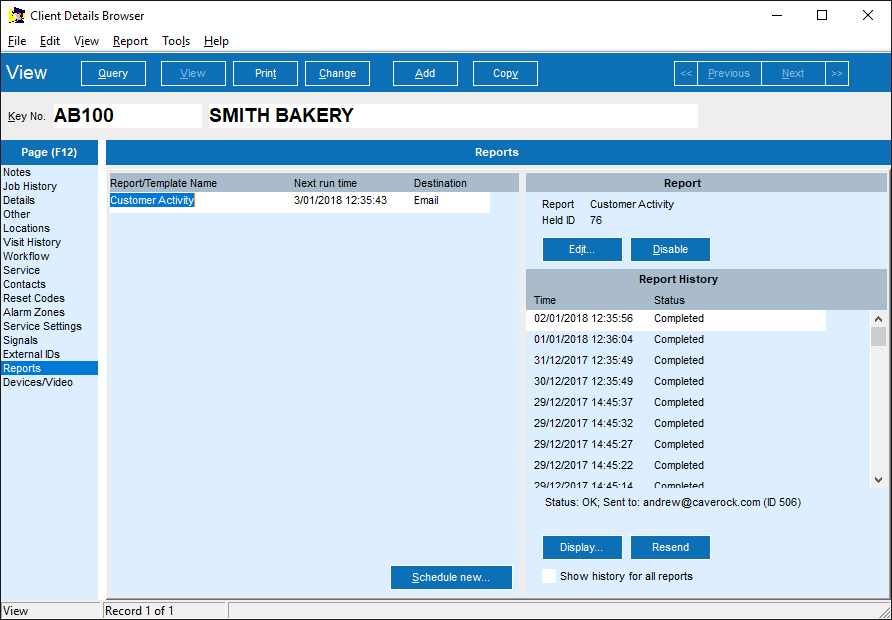
To schedule a new standard report for this client, click 'Schedule new...' (ALT+S) near the bottom of the window. You'll be asked which report template you want to use:
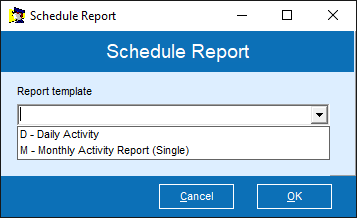
You can see the list of templates by clicking the drop-down, or you can type the shortcut key of the report if you know it already. Then click OK (ALT+O) and the report will be scheduled.
Note that it depends on the report template as to when the report will run and how often. In the standard definitions shown above, the daily report will run each day at 07:00, while the monthly activity report will run on the first day of the month at 07:30. Depending on your setup these will vary, and you can change the standard times and other parameters by going into Report->Templates from the Traffic screen.
You can create new templates from the Reports screen, described in Report Scheduling below.
Scheduling custom reports
A report can be scheduled to run automatically. Where possible, use Report Templates as described above. If your requirements aren't covered by a template then you can schedule a custom report or create a new template.
To do this, select the report and set its criteria as normal, but then select a different report destination from the panel in the bottom left before clicking the 'Generate Report' button. The available destinations are:
- Display now - displays the report immediately, as normal;
- Email to site - sends a copy of the report to all site contacts with email configured. Useful for emailing to customers;
- Email to site's area - sends a copy of the report to the email address listed on the client's billing area. Used to email area supervisors or contractors; and
- Email to address - GDS will prompt you for an email address to send the report to.
- Create template - use the criteria to create a template that we can run on clients as needed.
- Display Fax/Mail - click this to see display a copy of the report on-screen now. After display, the report will remain in the queue, awating release.
- Release Fax/Mail - click this to have GDS run the report and send it to its destination immediately. The report will be run only once and then removed from the queue.
- Schedule Fax/Mail - choose this and GDS will open a dialog box which allows you to set a time at which the report will be run. It also allows you to set up a repeat so that the report is re-run daily, weekly (set every 7 days), or monthly.
- Abort Fax/Mail - choose this to discard the schedule record and not run the report.
- a problem with the selection criteria in the report. If this occurs, abort the report and if necessary re-create it in the report screen;
- an incorrect email address for a contact. Correct the email address in client or contact maintenance, then resubmit the report;
- a problem with the network or the outgoing mail server. Once the mail server is operating correctly again, resubmit the failed jobs.
- Jobs
- Patrol attendances
- Barcode/tag scans
- Monitoring/alarm signals
- Cust From/To: selects jobs for customers with customer codes that are alphabetically in the range specified. For example, entering AB100 to AB199 will produce a report for all customers in that code range.
- Job Types: by default all job types are included. Click the 'Change' button below to select which job types to show.
- Show job details field: untick to hide the main job details field from the output
- Show non-customer details: if unticked (the default), GDS will omit certain fields from the report, and only dispositions marked for customer reporting will be listed. If ticked, all job details will appear on the report. Use it unticked for producing reports for customers, and tick it for reports for internal use.
- Show cost info: shows estimated job cost information at the end of each job.
- Format report for faxing: changes the report to be less ink-heavy so that it is more easily scanned by scanners and fax machines.
- Status Lists allow you to output data in a column only for job statuses that are in the list. For example, for noise control jobs use it to extract specific items required by the Council
- Max rows to return: by default the report will return no more than 2000 rows at a time, to protect you from accidentally exporting years worth of jobs! You can increase the limit by changing the 'Max rows to return' field
- Use this report to measure timings including onsite delay, onsite duration. You can measure arbitrary durations by using last status group time and first status group time, then subtracting them in the spreadsheet.
- Like any other, this report can be scheduled and it will by default email you the CSV file. It can also be set to dump the file in a given folder instead.
- The filename this report produces can be modified by date by including special terms in the filename. Mouse over the 'Filename' caption to see them.
Instead of running the report as normal, GDS will show the scheduling screen, where you can tell it when to first run the report and how frequently it should be repeated (if ever).
Here's an example. We have an internal user who wants to receive a report of all jobs that occur
each day. We'll start by going into the report screen as normal (Report->Show Reports). We'll
select the Job Listing report on the left, and set the criteria. While you can schedule them in
advance, a good time is actually to run the most recent report and schedule that instead. Say today
is the 2nd of February 2020. We'll tell GDS to give us all jobs that occurred in the 24 hours
up until 0730 this morning:
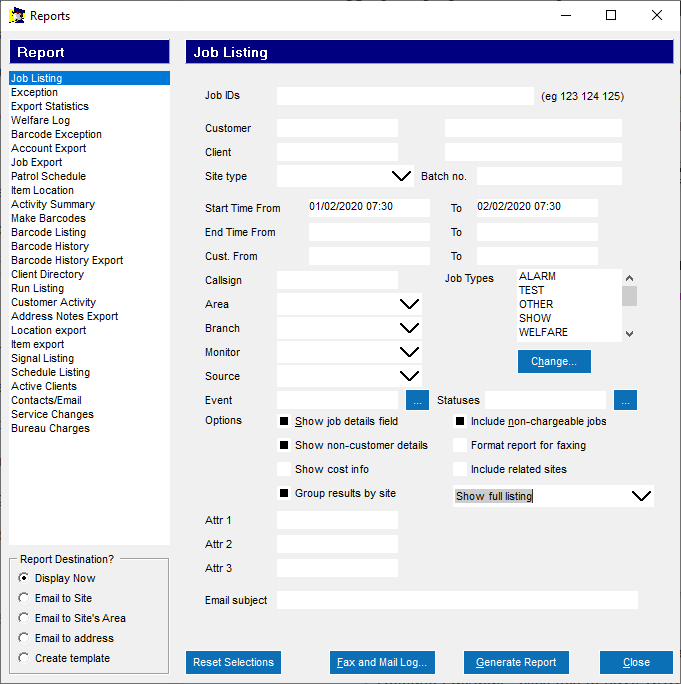
Note we've also ticked 'Show non-customer details', as this is an internal user, so we want to see
the details that would normally be hidden from customers. Also, for daily reports, it's always
a good idea to run them for a full 24 hours (in our example, 0730 on the 1st thru to 0730 on
the 2nd), that way it ensures you don't miss any jobs that occurred during the day.
Now we're ready for the next step. For a start, we'll preview the report. Ensure that
'report destination' is set to 'Display Now', as shown. Then click Generate.
You'll see the report covering last night's jobs. As long as that looks right, now we can schedule
it. Close the PDF if it's showing and come back to the Reports screen. All of your settings
from the preview are still here, so we can re-use them now. Change the Report Destination to
'Email to address' and click Generate again.
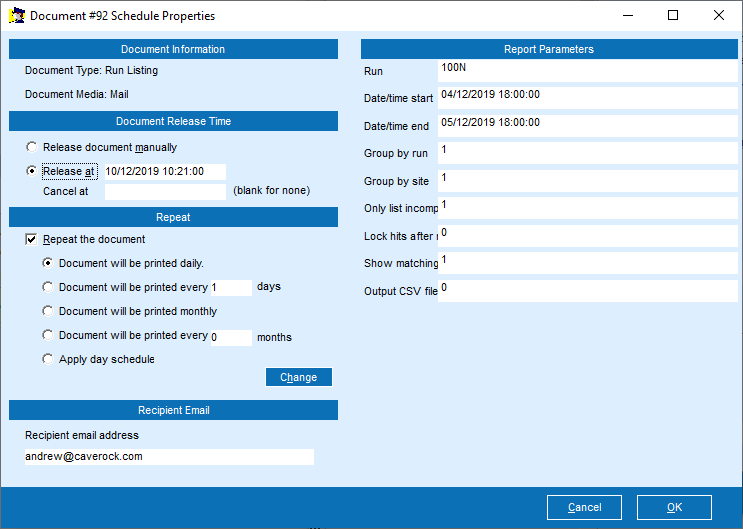
This time you'll see a screen like the following:
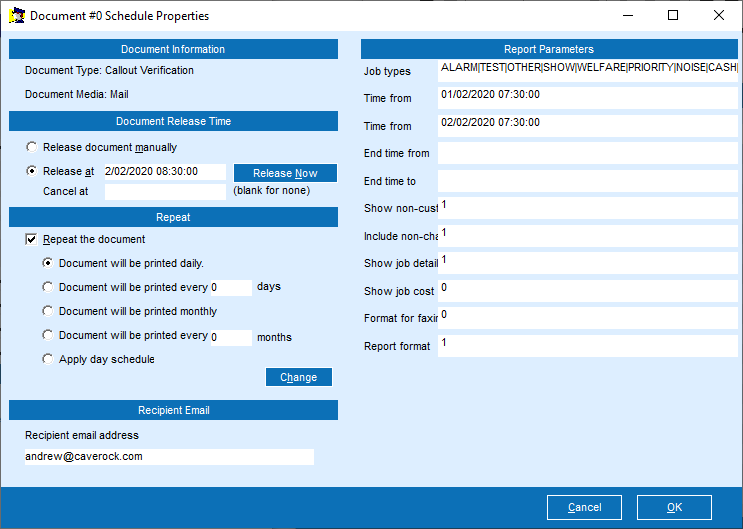
... we've already set this one up.
We changed the date to release this morning at 0830, and we've
ticked the 'repeat this document' to tell GDS to send it to us every day. By default,
it'll repeat daily, but if we want different frequencies, or reports on certain days
of the week, there are options below to cover those requirements. Finally, we've
filled in the email address of the recipient at the bottom. If you want to send
the report to more than one recipient, you can add additional recipients by putting
commas between them like this:
alex@acme.com, bob@acme.com, jane@acme.com
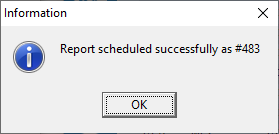
Once all of the criteria have been filled, click OK and you'll be given a reference
number:
Note that when we scheduled the report, we scheduled it to run this morning, even
though we really only want it to start tomorrow morning.
This is so that the scheduling aligns with the criteria we entered before - we've
asked GDS for last night's activity to be emailed to us this morning.
GDS will in fact realise that this morning is already over, and it'll send us that
first copy immediately, then it'll update everything for tomorrow's run. If you're
careful with your dates you can actually schedule it for tomorrow from the start,
but you have to fill in tomorrow's criteria, which can sometimes be tricky to think
about. It's generally easier to schedule today's report and get the extra 'test'
copy.
Manage scheduled reports
To manage your scheduled report, click the 'Fax and Mail log' button at the bottom of the window, click the 'Faxes and Mail Held' tab, and click 'Show All' to see the list of reports waiting to run. Right-click on a report line and you will see a set of options:
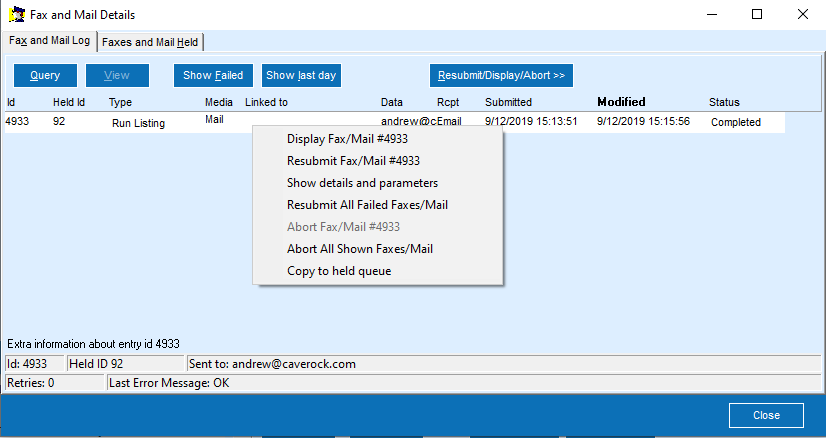
Once a report is released either manually or automatically via the options above, GDS creates an entry in the Fax and Mail Log tab for each occurrence of the report, and uses this to track its status. A normal report will start out as 'Pending' until the report server is ready to process it. It will change to 'Sending' state while it is being processed, then to 'Completed' once it has been successfully sent.
If problems occur, GDS may attempt to re-send the report (status 'Retrying'). If the report cannot be sent its status will change to 'Failed'.
Handling failed reports
You can see failed reports in the system by going to the Fax and Mail Log screen, clicking on the Fax and Mail
Log tab (not the Held tab), and clicking 'Show Failed'. This will show you all failed reports that need
to be handled.
Each Failed report in the system should be dealt with by a human to work out what went wrong. When the report line is selected, GDS will show an error message at the bottom of the screen, describing what went wrong. For each failed report an operator should decide whether to abort (discard) the report, or resubmit it so that GDS attempts to run the report again. You can do this by highlighting a report line and either right-clicking, or clicking the 'Resubmit/Display/Abort' button above.
You can either handle each report individually by clicking on it, or you can use the 'Abort all' and 'Resubmit all' buttons to process all reports shown on screen. Use Query and View as you would on any other screen to find the set of reports you want to perform actions on.
Troubleshooting
Possible problems with running reports include:
It is recommended that every failed report be either aborted or resubmitted. That way any reports left in failed state can be considered as needing action. Ideally have an operator come in here on a daily basis and click the 'show failed' button and deal with anything that comes back.
Identifying and updating a report
If you have a particular report that has failed or needs to be changed, you can identify it using a couple of
methods.
If you have a copy of the report to be changed, look at its header:

... beside the time and date the report was produced, you'll see a number in square brackets. This is the
report log ID, which you can search for. Go into the Fax and Mail log, make sure you're on the log tab (not
the held tab), click Query, type the ID in the ID field and click View. You'll see the representing GDS's
attempt to send this report.
If you want to attempt to resend this report (useful if there was a mail server problem), right click on the
report and choose 'resubmit'. You can also abort the processing if you don't want to retry the report.
An interesting field is the 'Held Id'. This is the ID of the held or repeating document that this copy of the
report came from. You can use this Held ID to change future instances of this report. To do so, go into
the Faxes and Mail Held tab, click Query and search for the Held ID here.
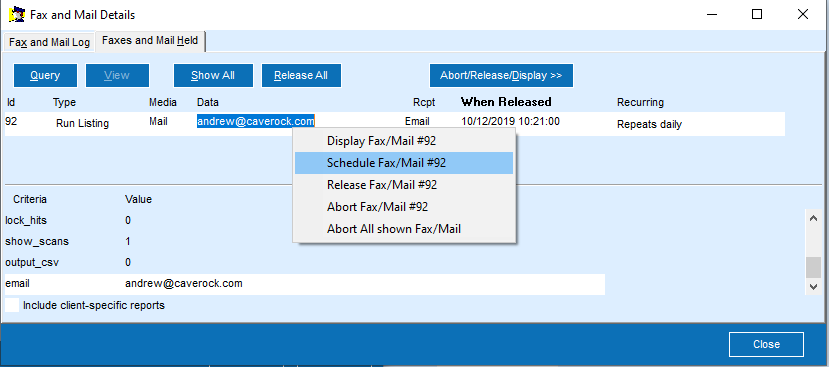
Here you can see the report as it is scheduled to run in the future. If you abort this held document, it'll
stop copies of it from being generated in future. You can also re-schedule the report, which allows you to
change the future scheduling and the destination email address (if specified).
Note that you can only change the email address if it was specified when scheduling. Otherwise if the
report is being sent to the site, GDS will email it to all contacts with the EMAIL role. If this is the case,
go into the Contacts tab in Client Maintenance and add or remove contacts there.
Useful Reports
Some of the most useful reports available are detailed below:
Customer Activity
Intended to be the primary report sent to customers, produces a PDF report that can be printed or emailed. It shows:
It shows a summary of all activity in a format appropriate for customers. Information is restricted to customer-accessible details.
Job Listing
This report produces a PDF report containing details of jobs handled in the system. You can choose the jobs to be shown based on a range of criteria covering the job and the client/site that the job was for. Only jobs matching all of the criteria specified will be included in the report.
Most of the criteria are pretty self-explanatory, but some items deserve special mention:
Job Export
The 'Swiss Army Knife' for job analysis. This allows you to create a CSV (spreadsheet) file based on jobs within GDS - one line for each job. For each job, GDS outputs a set of columns for value fields that you select. Click the 'select fields' button to change the fields.
Things to watch out for:
Account Export
Allows you to export client details to a spreadsheet. Once again, based on user-selectable fields. Useful for mail merges or exports to other systems that you use in conjunction with GDS. Another use for this is to export data for a set of clients to a spreadsheet, change the data there, then import the data back in using GDS's CSV import facility.